Extensions
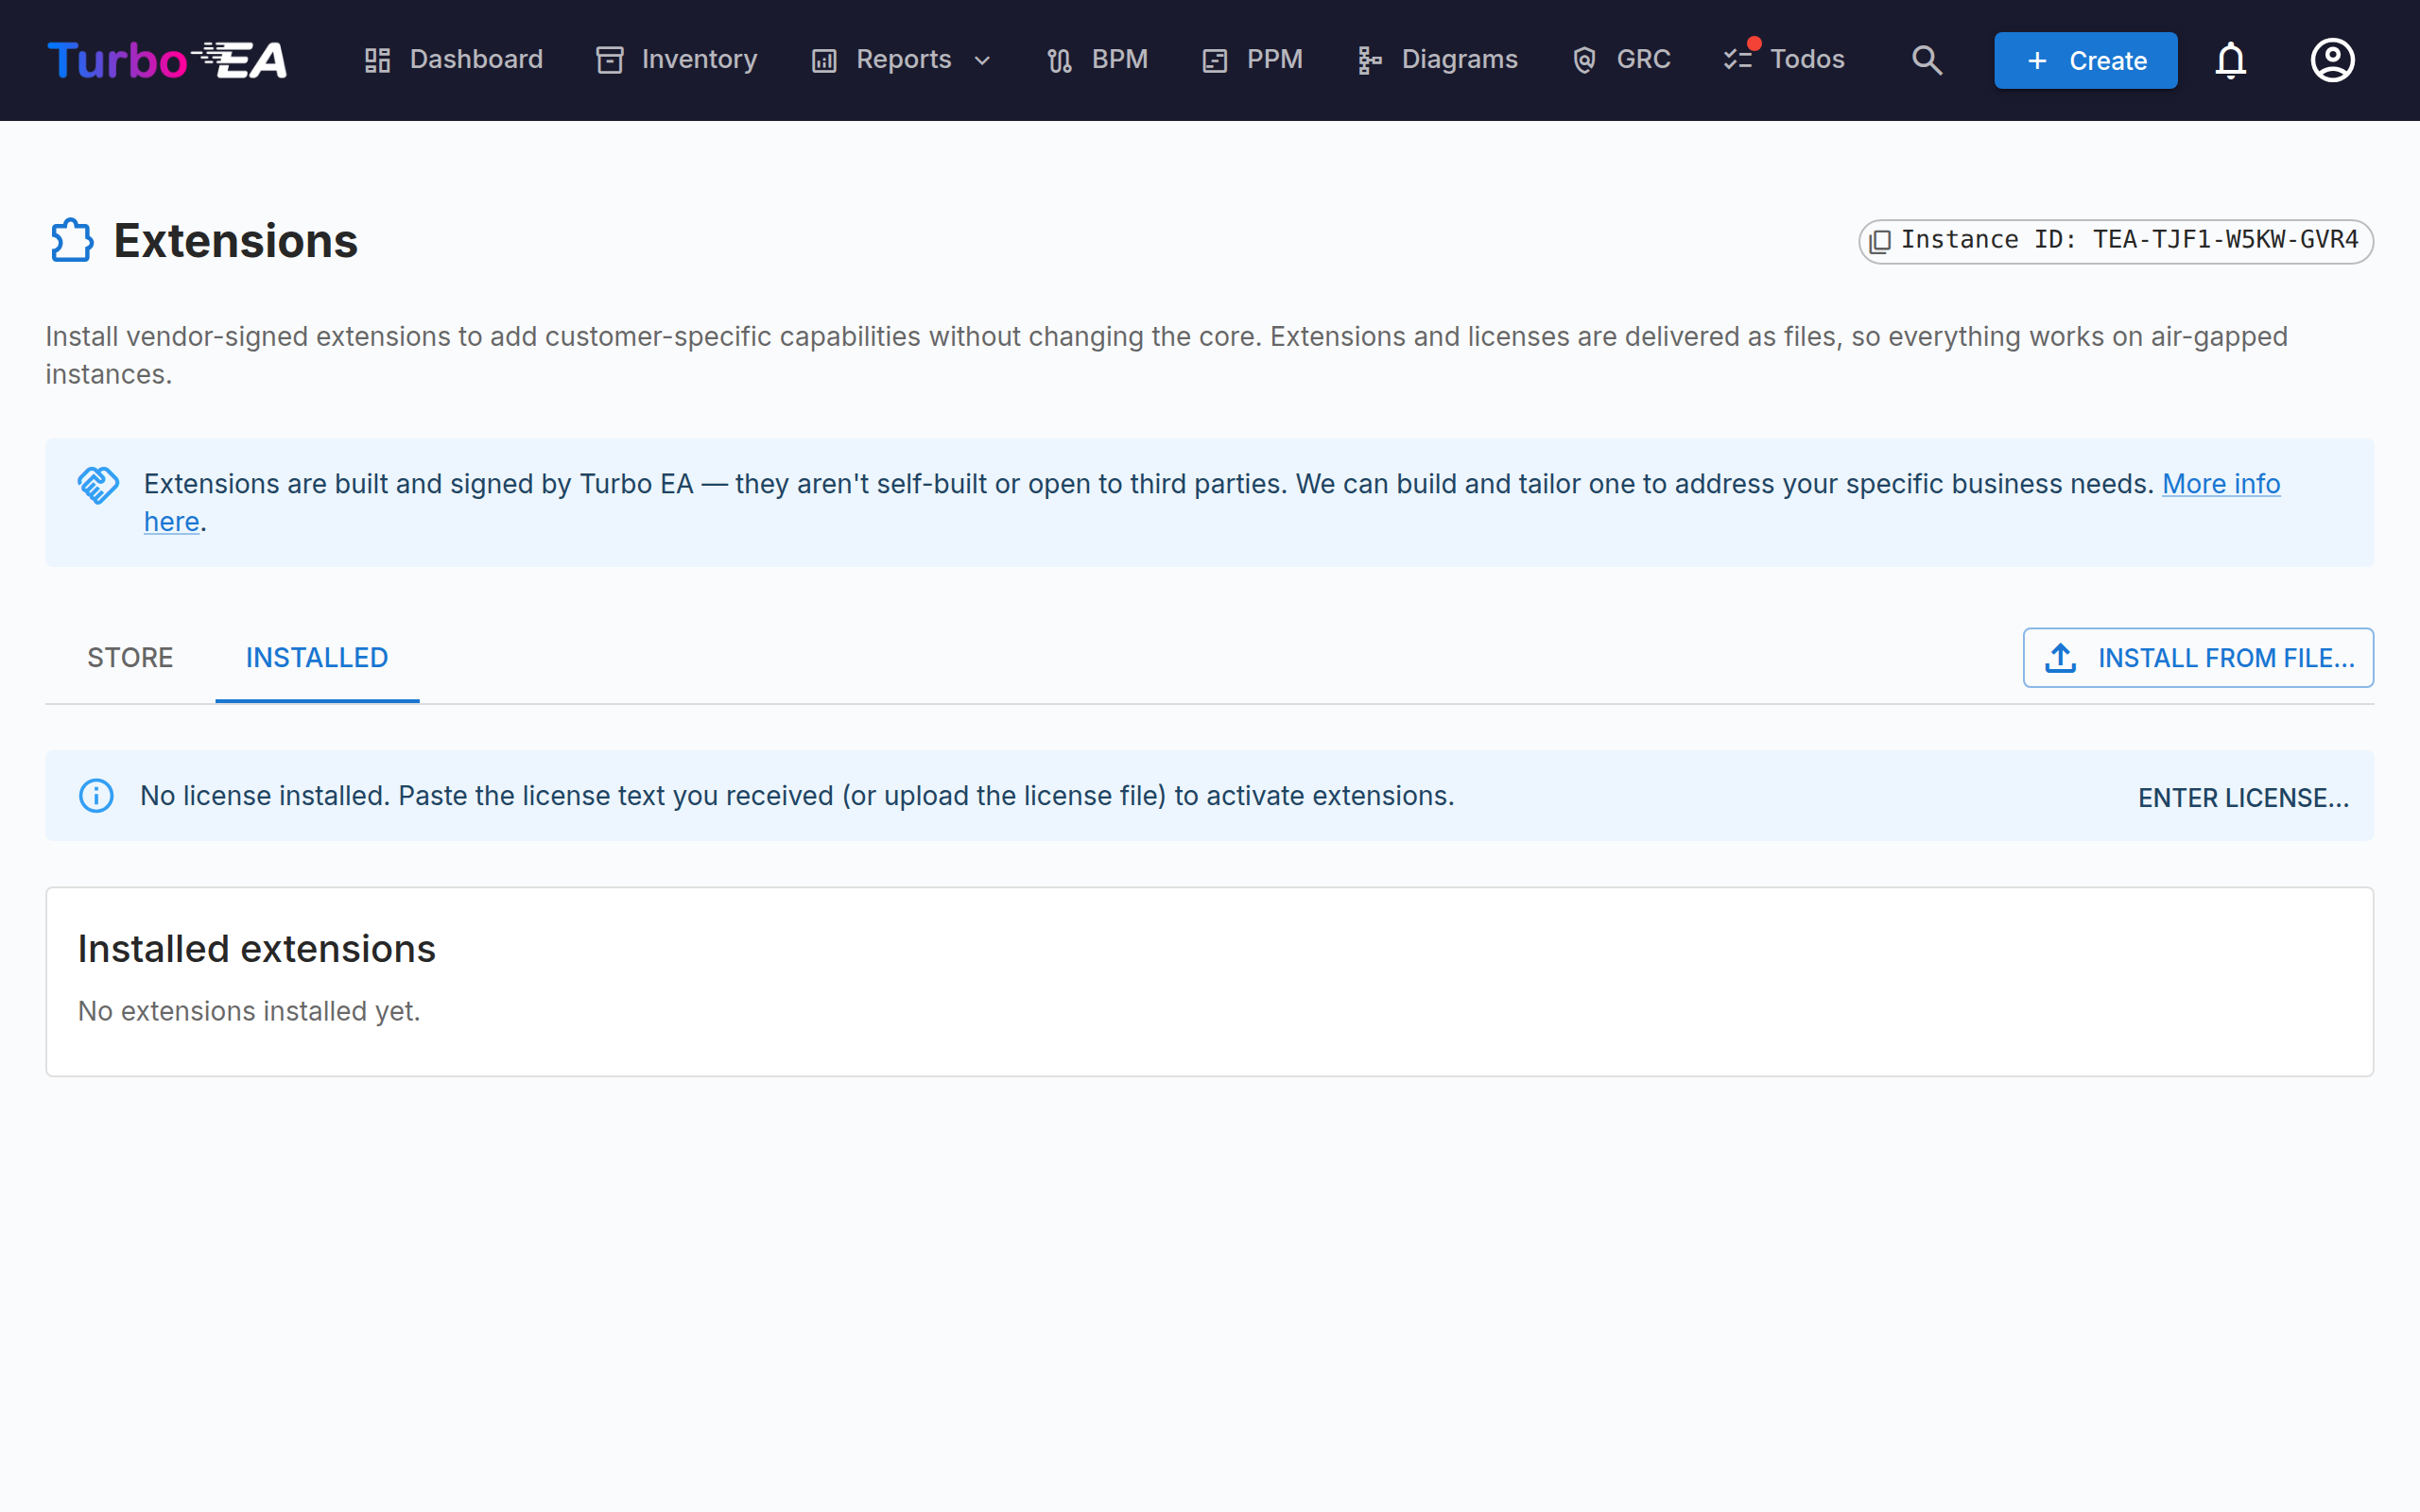
The Extension Store (Admin → Extensions) installs vendor-signed extensions that add customer-specific capabilities — extra metamodel content, integrations, background jobs, and even new pages — without changing the Turbo EA core ("clean core" principle).
Extensions can be installed two ways: one click from the built-in Store (when your instance has internet access), or by uploading the files directly — the extension is a signed .teax bundle and the license is a signed text file, both typically sent by email. The file-based flow needs no store account or outbound connection, so the whole workflow works identically on air-gapped instances.
The page has two tabs: Store browses your vendor's extension catalogue with one-click install, and Installed manages licenses and installs from files.
Extensions are built and signed by Turbo EA — they are not self-built or open to third parties. If you need a capability tailored to your organisation, we can build and license it for you. See Turbo EA consulting.
Guides for each extension
Every extension published in the store has its own user guide — what it does, how to set it up, and how to use it day to day. See Extensions.
How trust works
Two independent checks protect your instance:
- Provenance (signature). Every bundle carries an Ed25519 signature by the vendor's signing key. Turbo EA verifies it on upload and again at every backend start. Unsigned, tampered, or third-party bundles are rejected — an extension that installs is guaranteed to be exactly what the vendor built.
- Activation (license). A signed license file lists your entitlements — one per extension, each with its own expiry. An installed extension only runs while a usable entitlement exists. Licenses are bound to your instance ID — a license issued for a different instance is refused.
Free extensions
Some extensions are free and require no license at all. They install and run straight away — there is no purchase step and no license file to paste. Free extensions are marked with a Free badge on the Store and Installed tabs, and the Buy and Renew actions are hidden for them. The signature check still applies exactly as for paid extensions (a free extension is still vendor-signed), so provenance is guaranteed either way. Because they need no entitlement, free extensions never lapse or enter a grace window.
Your instance ID
Every installation generates a unique instance ID (TEA-XXXX-XXXX-XXXX) once, shown at the top of Admin → Extensions with a copy button. It is your licensing identity: quote it when purchasing (the in-app Store sends it automatically; the storefront checkout asks for it) so that every extension bought for this instance — by any administrator, under any email — lands in one combined license. It identifies your instance only; it is never a credential, so it is safe to share with your vendor.
The ID travels with a workspace transfer, so moving to a new host keeps your license working. After a full reinstall the instance gets a new ID — ask your vendor to re-issue your license for it (a quick "re-key" on their side).
The Store tab
The Store tab works out of the box and lists the vendor's published extensions as a grid of compact tiles — logo, name, licence state and price. Click any tile to open a large details window: a screenshot gallery on one side — step through it with the arrows or the thumbnails, click a screenshot to view it full size — and, beside it, the full description, category tags, source/licence credits and the actions. When the store publishes release notes for the extension, the two most recent releases appear under What's new, with a Full changelog link to the extension's page on the store. Extensions that ship no artwork show a generated tile carrying their initials.
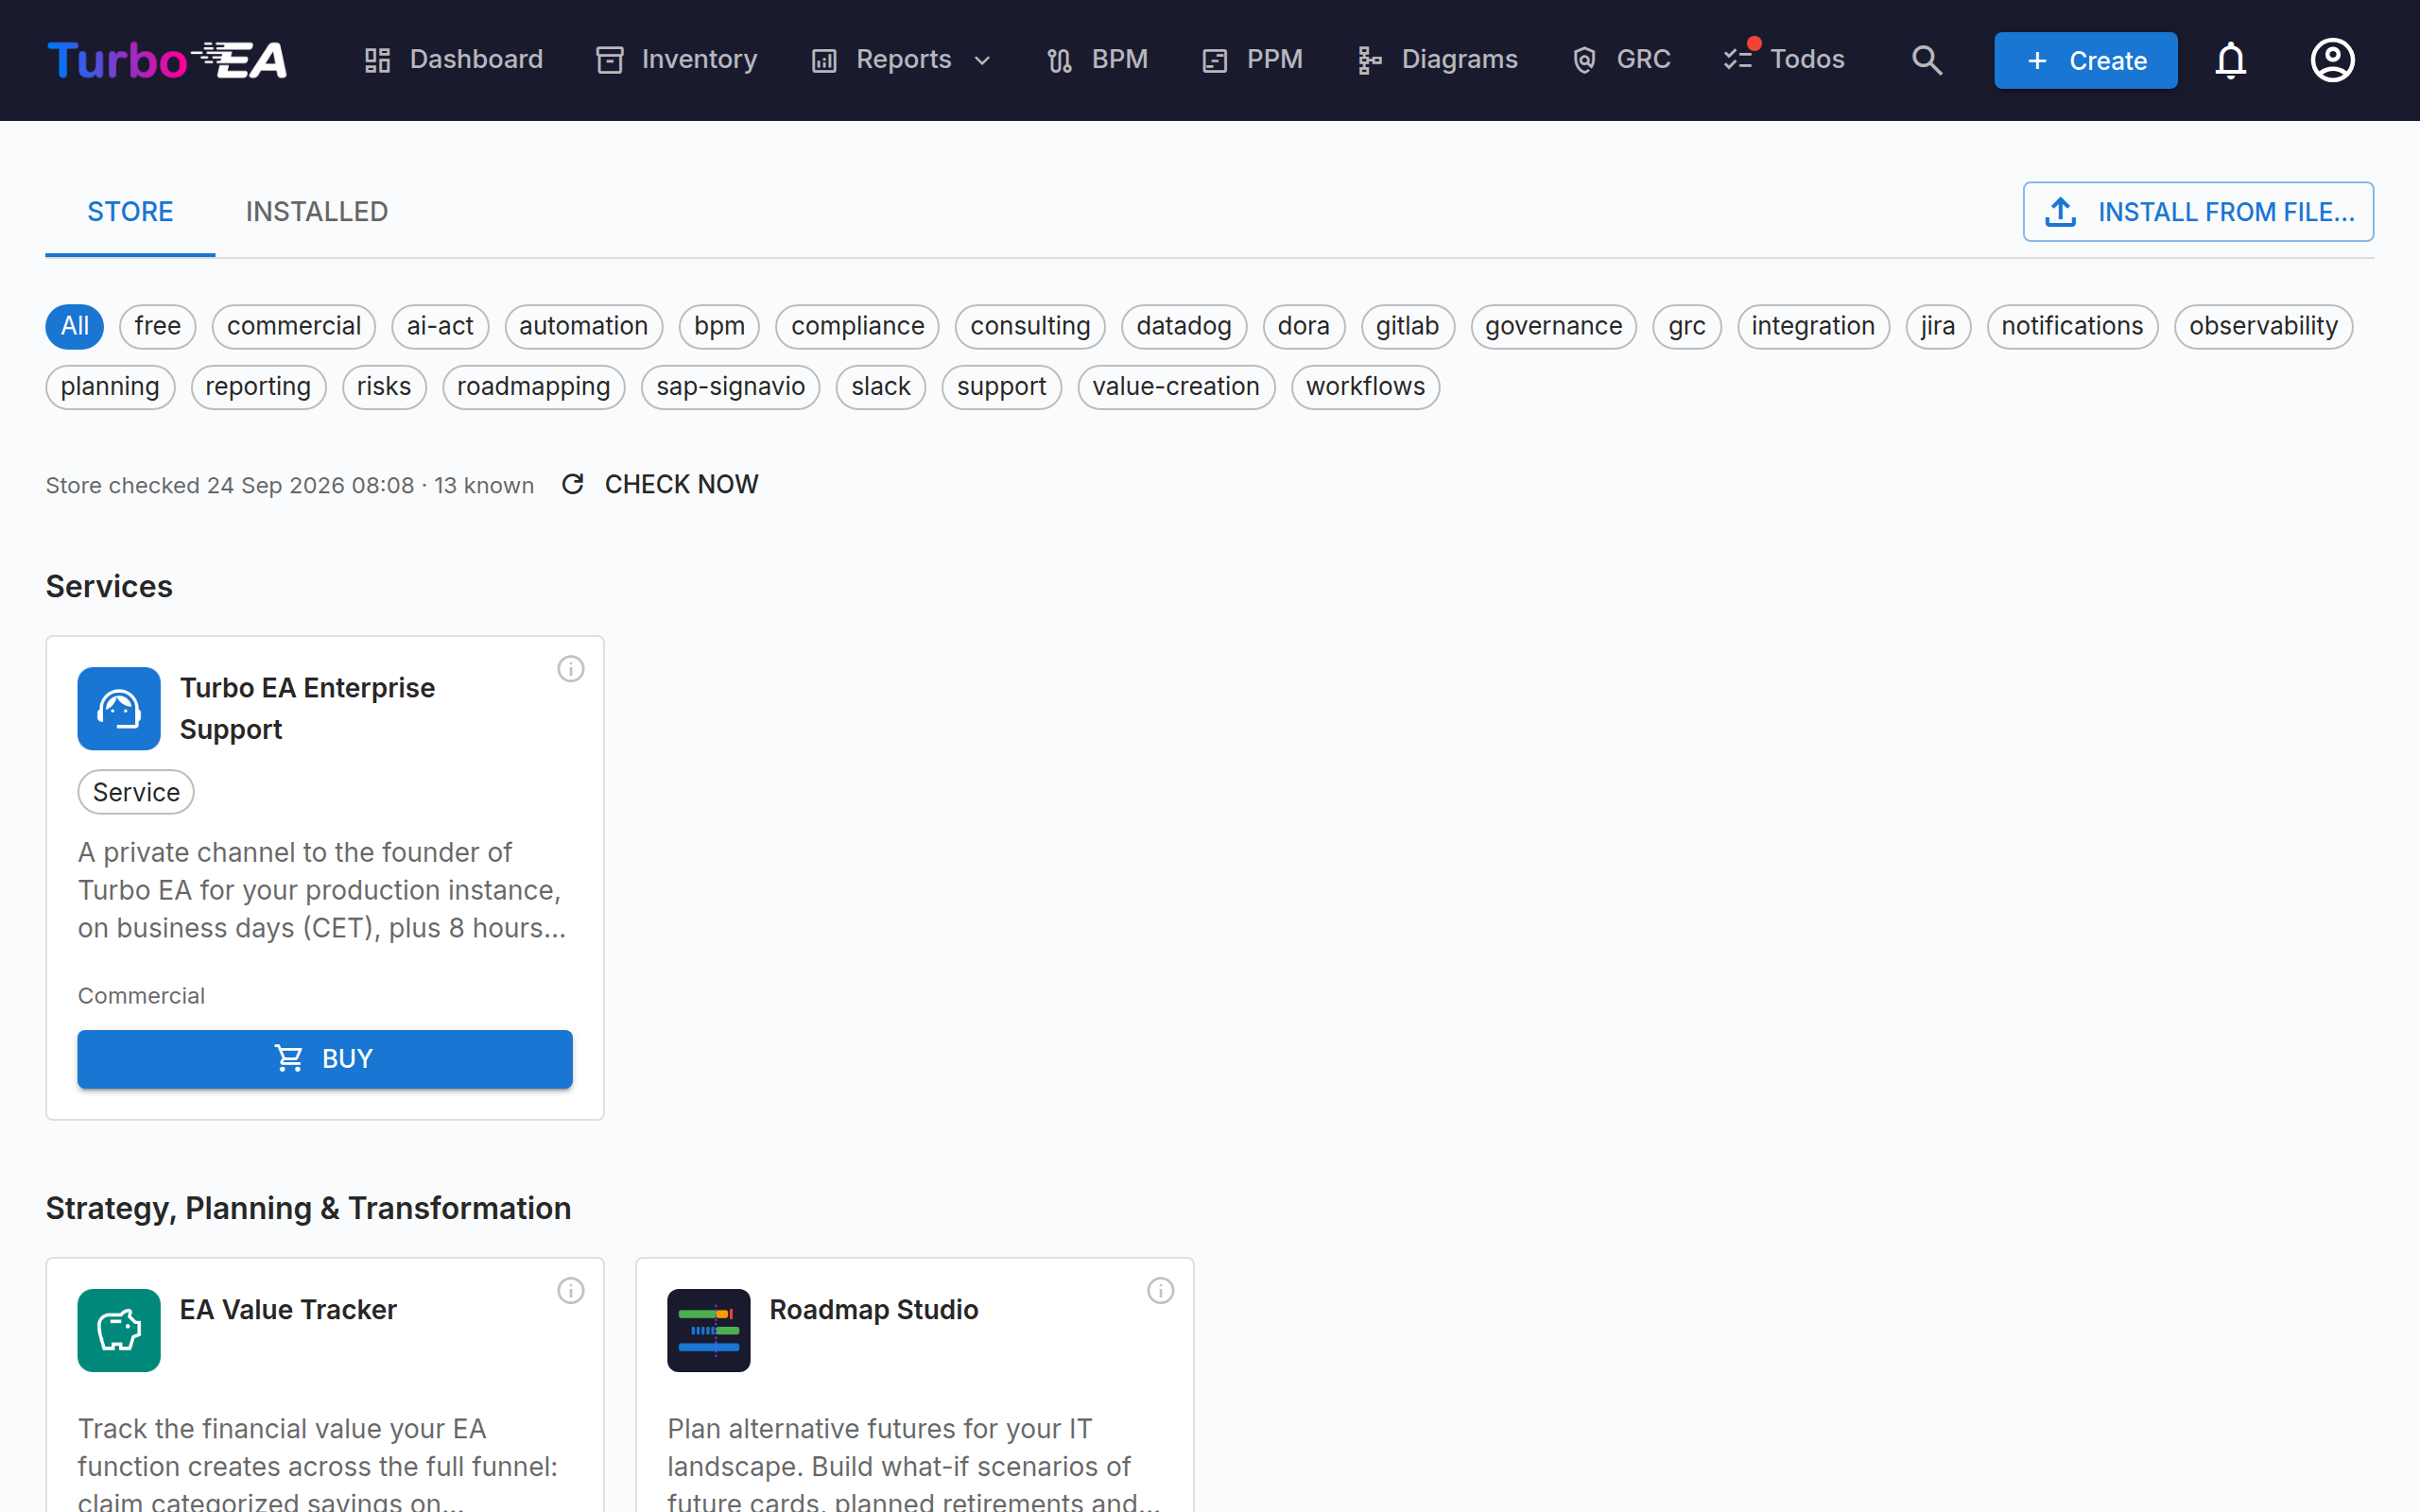
- Buy opens the payment page in a new browser tab. Once the payment is confirmed, your license applies automatically (a copy also arrives by email).
- Some listings are sold on two plans: a monthly one and a yearly one, the yearly usually at a discount. Their details window then offers Buy monthly and Buy yearly instead of a single Buy, and either one takes you to the same checkout.
- Install (or Update when a newer version is published) checks your license first — if the extension isn't licensed yet, a dialog offers to buy it or paste a license, then continues automatically — and downloads the bundle through the exact same signature verification and dry-run preview as a manual upload. Extensions with a demo show a See it in action link. The button reads Update only for an extension you already have installed; on anything else it is a plain Install that fetches the published version.
The catalogue is arranged in five sections — Strategy, Planning & Transformation, Governance & Automation, Integrations, Regulations and Services — each with its own heading, so you can see at a glance what kind of listing each one is; anything the catalogue has not classified appears under Other at the end. Within the sections, tag pills (free or commercial, plus topics such as integration) work as a filter: a filter bar appears above the list, clicking pills narrows it (several pills combine), sections with no match disappear, and All resets the view.
A service listing — an offering with nothing to install, such as a support subscription — is sold and licensed like an extension but carries no bundle. Its tile and details window offer Buy only, show no version, and say so plainly; once the purchase is confirmed the same entitlement chip (Renews on …) appears on the tile, and your confirmation email explains how to use what you bought.
The Store tab is read-only and anonymous: no account, no token, and nothing about your instance is sent anywhere — it only reads the vendor's public catalogue. Air-gapped instances need no configuration — the tab simply shows a friendly hint — and use the file-based flow below; the vendor's storefront website offers the same purchases and downloads from any internet-connected browser. If something between your instance and the store blocks the request — a proxy, a firewall, or bot protection in front of the store — the tab says so and names the HTTP status it got back, so a blocked instance is never mistaken for an air-gapped one.
The instance also checks the catalogue once a day and tells you what changed, so a new extension — or a security fix to one you already run — does not wait until somebody happens to open this page. Administrators (anyone whose role grants admin.manage_extensions) get a notification in the bell when a new extension is published to the store, and another when an extension they have installed has a newer version. Each change is announced once, and a busy release day arrives as one notification per kind rather than one per extension. Nothing is downloaded or installed — the notification simply brings you here. The daily check can be switched off entirely under Admin → Settings → Update notifications.
The tab also shows when the store was last read, and a Check now button that runs the check immediately and reports what it found — so you can confirm the daily check is working without waiting a day. If a check failed, the reason is shown here rather than staying silent.
Trials
Some paid extensions offer a free 30-day trial — look for the Start 30-day trial button on the Store tab (or the trial option on the store website). Starting a trial works like a purchase without the payment: no credit card is needed, your license updates automatically (a copy also arrives by email for air-gapped installs), and the extension runs with full functionality for 30 days.
- Each Turbo EA instance can trial a given extension once.
- A trial ends exactly on its end date — there is no grace period. The extension then stops running until you subscribe; your data is never deleted, and everything comes back the moment a subscription license is applied.
- The Installed tab shows trial entitlements as Trial until ….
- Trials end by themselves — there is nothing to cancel and nothing is ever billed.
Installing an extension
- If you have not done so yet, apply your license first (see below).
- Open Admin → Extensions and press Install from file… above the catalogue on the Store tab or above the list on the Installed tab (and inside the notice shown when the store cannot be reached), then upload the
.teaxfile you received. - Turbo EA verifies the signature and opens an install dialog with a preview: for content-carrying extensions this is a dry-run of every card type, tag group, card, and relation the extension would create or update — nothing is written yet.
- Review the preview — it scrolls inside the dialog — and press Install extension at the foot of the dialog, where the action stays put however long the preview is.
- If the extension carries backend code, a banner asks you to restart the backend container (
docker compose restart backend). Content and UI extensions are active immediately — users pick up new UI on their next page load.
Uploading the same bundle again is safe — the preview shows everything as "skipped" and applying changes nothing.
Updating an extension
When the store publishes a newer version of an installed extension, the Installed tab shows an Update to X chip next to the extension's version (and the Store tab's button turns into Update). Clicking it verifies the signature and downloads the bundle, then shows you what is in the release — the extension's own release notes, with a Full changelog link to the rest — with Install and Cancel. Nothing is written until you press Install, and Cancel discards the download. A first installation has no previous version to compare against, so it still applies in one click. While an install or update runs, the button (or chip) shows a spinner and stays disabled until it finishes, and the install dialog shows the run wherever you started it from. Two safeguards apply:
- Updating an extension you have deliberately disabled keeps it disabled — the new version lands on disk, but its content stays hidden and nothing runs until you enable it again.
- Installing a bundle older than the installed version asks for an explicit confirmation first: a downgrade may not understand data written by the newer version. Nothing is deleted either way.
When the update lands, everyone who can use the extension gets an Extension Updated notification in the bell, and can open the same release notes from it. It is on by default and never sent by email; each person can mute it under their notification preferences.
Licenses and renewal
Apply a license via Enter license… on the Installed tab (paste the text or upload the file) — the button also appears on each extension row that needs one. The page then shows the licensee and one chip per entitlement with its expiry date.
Your instance holds one license at a time — applying a new one replaces the previous one. Store-issued licenses always contain every purchase made for your instance, so replacing is safe. If you also hold manually issued licenses, ask your vendor for one combined license instead of installing per-extension files; should a license you apply drop entitlements the current one still covers, Turbo EA lists them and asks for confirmation first (no data is deleted either way).
When an entitlement passes its expiry it enters a grace window (30 days by default): everything keeps working and administrators see a warning banner. After grace the extension is soft-disabled — its pages disappear, its API refuses requests, and its background jobs pause. No data is ever deleted. Applying a renewed license file restores everything instantly, without a restart.
Licenses bought through the Store renew themselves on connected instances: after each successful payment, your instance fetches the extended license automatically — nothing to paste. Renewal on an air-gapped instance is: paste the updated license file from the renewal email (or request one from your vendor) — nothing else.
Auto-renew status and cancelling
Each entitlement chip states what happens on its date: Renews on {date} for an active subscription, or Expires {date} — will not renew after a cancellation. This comes from the signed license itself, so it is accurate on air-gapped instances too — the license file emailed after any subscription change carries the updated status; paste it and the chip is current.
To see the renewal date, cancel or restore auto-renew, change the payment method, or download invoices, use Manage subscription next to the licensee name (shown for store-bought licenses). It opens your billing portal in a new tab — no account needed. On an air-gapped instance the button cannot reach the store; use the Manage subscription link included in every license email instead (your browser only needs internet access, your Turbo EA instance does not).
Cancelling never switches anything off immediately: the extension keeps working until the end of the paid period, then the normal grace + soft-disable flow applies. Your data is never deleted, and resubscribing restores everything.
Enabling, disabling, and uninstalling
- The Enabled switch soft-disables an extension immediately (no restart) and can be flipped back at any time. For content packs this hides their card types from the metamodel — cards stay where they are.
- Uninstall removes the extension's files and hides its card types from the metamodel. Cards and the extension's own tables are deliberately kept, and everything — types included — reappears if you reinstall.
Permissions
The whole page and all its API routes are gated by the dedicated admin.manage_extensions permission (granted to the built-in Admin role). Extensions can define their own permission keys (ext.<name>.…), which appear in Admin → Users & Roles once the extension is loaded.
Advanced field capabilities
Some extensions unlock advanced ways to describe your data that the core does not offer on its own:
- Field help text — collapsible guidance shown under a field while people enter data, so a form explains itself.
- Custom field types — new kinds of field beyond the built-in set (for example a configurable rating from 1–5 or 0–10).
These options appear in the metamodel field editor only while the extension that provides them is installed and licensed. If such an extension is later disabled or its license lapses, the values you already captured keep displaying as plain read-only text — nothing is blanked or deleted — and the authoring options simply disappear until the extension is active again.
Data access grants
Most extensions only work with their own data. An extension that integrates with core data — for example a connector that syncs todos with an external task tracker such as Jira or MS Planner (#921) — must declare grants in its signed manifest:
core.todos.read/core.todos.write— read or change todos through the extension SDK. Write implies read. On system todos (such as sign-off requests) a sync extension can only set the external reference shown as a chip — it can never complete, edit, reassign or delete them, and it can never touch todos owned by another extension.core.events.todo— receive todo change events, so a connector reacts to a completed todo immediately instead of on its next polling cycle.core.users.read— look up users (name, email, active flag only) so a connector can match assignees with accounts in the external tool. No role, login or preference data is exposed, and extensions can never change users.core.cards.read— read cards, relations and the metamodel, e.g. so a connector can match your applications against records in an external system. Archived cards stay out of view.core.cards.write— create, update or archive cards, add relations and set tags, with exactly the validation the app's own editor applies. Updates merge field values rather than replacing them, so an extension can never wipe data it does not manage, and there is no permanent delete — archiving, with its restore window, is the only removal an extension can perform.core.events.card— receive card and relation change events, so a connector reacts to inventory changes immediately instead of on its next polling cycle.core.notifications.channel— deliver the notifications you opt in to on a channel of the extension's own, such as a chat message. The extension receives a notification's title, message and link plus your user id; it does not receive your email address unless it also declarescore.users.read, and it never receives a type you have not switched on for it. Notifications that stay in the bell only are never sent to an extension channel. Every extension channel starts switched off for every notification type — the administrative notices included (new extension, extension update, Turbo EA update): open your notification preferences from the bell and switch the channel's column on for the types you want there. A notice that was already shown in the bell before the channel was switched on is not sent again.core.adr.read— read architecture decision records (reference, title, status, linked cards and the extension's own data on them).core.adr.write— file a draft architecture decision and link it to active cards, for example an extension that records the outcome of an analysis as a decision for people to review. Write implies read. An extension can never sign a decision, send it for review or change its status — those stay with your users — and it can only store data under its ownext.<key>.*keys on the record. Each filing is recorded in Admin → Audit log as anext:<key>batch.core.risks.read— read the risk register (reference, title, category, level, status, owner, linked cards).core.risks.write— raise a risk and link it to cards, for example a rule that files a risk when an application crosses a cost threshold without an owner. Write implies read. A risk raised this way shows Extension as its source in the register, gets its reference from the same sequence as everyone else's, and its owner receives the usual todo and notification. An extension may later update the title, description, owner and target date of the risks it raised — never anyone else's, and never a risk's status: moving a risk through its workflow, accepting it and closing it stay with your users.core.notifications.send— send a notification to named people, for example "a rule you set up just fired". It arrives as the Extension notice type, or as a type the extension declares for itself, which then gets a row of its own in each person's notification preferences (in-app on, email off by default) — either way each person decides whether it reaches their bell, their inbox or an extension channel, and can switch it off. Some of these notifications open their details in the app when clicked, offering the related card and the extension's own page only to people who may open them. The link in such a notification can only point inside Turbo EA.core.stakeholders.write— assign or remove stakeholder roles on cards, using exactly the roles the card type defines. This is a separate grant fromcore.cards.writebecause a stakeholder role gives the person permissions on the card.core.surveys.read— read a survey's name, status and how many of its requests were answered.core.surveys.write— send a data-maintenance survey to the stakeholders of a set of cards, for example a scheduled rule that asks the owners of every mission-critical application below the data-quality target to complete their cards — one request per person instead of one todo per card. Write implies read. The survey appears in Admin → Surveys with no author, its fields are exactly those the card type defines, and each person gets the usual survey notification. An extension can never close a survey or apply its answers — those stay with you — and rolling back the run that sent it (Admin → Audit log) closes the survey and withdraws the requests nobody had answered yet.
Grants ride inside the vendor-signed bundle, so they are fixed at packaging time and visible before you install. They only apply while the extension is installed, enabled and licensed — disabling it or letting the license lapse revokes access immediately, no restart needed. Every change an extension makes is recorded in Admin → Audit log under the Extension origin as an ext:<key> batch with per-field diffs, and can be rolled back from there like any other batch. A todo mirrored from an external tracker shows a chip linking to the external item.
Operators keep the last word on inventory writes: setting the environment variable EXTENSION_WRITES_ENABLED=false pauses every extension write instantly (reads keep working, no restart needed), and EXTENSION_MAX_WRITES_PER_BATCH / EXTENSION_MAX_BATCHES_PER_MINUTE cap how much a single extension can change per batch and per minute.
Where extension pages appear
Extension pages appear in the navigation once the extension is installed and licensed — usually as their own top-level menu item, though some are placed inside a core menu alongside the built-in entries: reports under Reports, and governance, risk or compliance pages under GRC. A grouped page falls back to a top-level entry when its menu is unavailable — the module is switched off, or you lack its permission — so it never disappears from the navigation.